Wednesday, December 21, 2011

Friday, October 14, 2011

BLOGIVERSARY CHALLENGE: Monochromatic Color Challenge!

As I stated in my previous post this would be the last of the BLOGIVERSARY CHALLENGE: over on the Cricut Circle Blog. For this challenge: Create a project of your choice using a monochromatic color scheme. Your project must include at least 2 different Cricut Image Cuts.

I had fun with this one using my newly delivered Chic and Scary cartridge.
I really liked my finished project.


Thanks again for looking and don't worry that this may be my last post for a while as I found a few other challenge to work on with later due dates so stay tuned


Thursday, October 13, 2011

BLOGIVERSARY CHALLENGE: Sketch Challenge!

The Challenge: Create a project of your choice using the sketch below. Your project must include at least 2 different Cricut Image Cuts. This one was kind of fun for me. I love sing sketches for my cards, otherwise I feel they all start looking the same: a piece of patterned paper with a die cut on it somewhere.


For this card I used patterned paper from my stash, as well as glittered card stock for the pumpkin person. I used Mini Monster to cut the title and the Pumpkin person. This cart has a lot of great cuts for Halloween. I cut the bat from the Hello Kitty Greeting cartridge and used fun foam to make it stick out a little. The ribbon was from stash as well.


As always thanks for looking and look forward to one last challenge. The monochromatic challenge. I already of the project in mind so I should be done in plenty of time.


Wednesday, October 12, 2011

BLOGIVERSARY CHALLENGE: Recipe Challenge!

I've been keeping busy working on these challenges, as some of them have really challenged me.
The Challenge: Use your Cricut machines to create a project using the following “recipe.” It must contain 1) A Title; 2) Atleast 2 Cricut Cuts, and 3) Atleast 3 buttons.


I made this card for my sweet little great neice who will be 3 this Sunday. She is having a wild west party with Pony rides and all. I used the Old West Cricut Cartridge for the Cowgirl, horse and title. Threw in some buttons on the vest and a bling on the halter. Then added the title.

Two more challenges to go all due by midnight on the 14th

Thanks for looking

Saturday, October 8, 2011

BLOGIVERSARY CHALLENGE on the Cricut Circle Blog

I had a couple of cards that I needed tt make and I noticed that the Circle Blog was having a few challenges for their blogaversary so I decided to kill two birds with one stone.
The 1st one is from this challenge


The Challenge: Use your Imagine Machine to print a background (it can be a solid color or a patterned paper from your Imagine cartridge) and use it on your project as well as cutting an image of your choice in layers- that’s right, choose the layers option on your image and print out one or all of the layers offered, piece them together on your project!


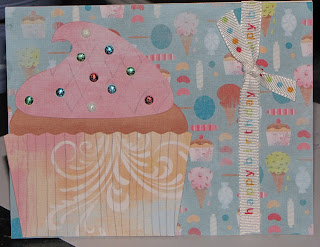
So I made this cute cupckae card for a friend of mine.

It's really no secret that a few months after I won my Imagine I began to hate it and this would be the last prject that I made with it because I sold the machine the very next day.


For the next challenge we were asked to create a project of your choice with one or more of the Cricut Circle Exclusive cartridges! (French Manor, Shall We Dance, Cricut Everyday, Pop-Up Neighborhood, or Sophie) Your project must include atleast 2 different Cricut Image Cuts. And YES! You can mix in other cartridges with your Circle Exclusive cartridges.
A friend of mine asked to make a card for her to give to a friend and showed me a picture of the gift bag she bought. It was very vintage french so it was nonbrainer that I would turn to French Manor to help me make the perfect card. I found the back on the internet and knew it was just the right element to make my card pop! I added some bling to really set it off.


Thanks for looking and keep checking back as there are still afew more challenges I need ot work on.


Saturday, October 1, 2011

Cricut Circle Contest

Here is my enrty for the challenge over at the Cricut Circle Blog.


Posted by Picasa

Friday, September 30, 2011

Worl Card Making Day Contest Entry

Over at http://cricutblog.org they are having a contest for World Card making day. I created this cute Mickeystein card for a friend for Halloween. I used graphics from www.pccrafter.com from the background and they Mickey was cut from the Mickey and Friends cart. I altered him a bit to look like Frankenstien. I really like how he turned out. Thanks for looking.


Posted by Picasa

Thursday, August 11, 2011

POP-UP NEIGHBORHOOD CONTEST! on the Circle Blog

Here is my Entry for the Magazine contest that the Cricut Circle Blog is having. I thought it was going to be tough coming up with something but once I flipped through the book the ideas just kept coming. I decided to scrap the night our Blazer had to be towed because the water pump went out. I talked my DH in to going to my favorite scrapping store Roberts Crafts and when we came out it wouldn't start. He is a good mechanic but try as he might he couldn't get it running and it was getting late. I think it was almost 11:00 when he finally gave in a called a tow truck. The rise back to our house was quite a treat... the drive would not shut up he talked the entire 45 minutes and was probably still talking as he drove off. Any way here were the rules and the prize isn't too shabby either I am trying to win my way to an E2 anniversary edition.
Use your exclusive Pop Up Neighborhood cartridge for this new contest! We love the fun versatility of this fabulous cartridge and want you to create any kind of project for this challenge. Design a home décor project, Layout, Card or mixed media project. Keep reading… you will have a wonderful time spending your prize!

Contest Rules: Use at least 4 Cricut Cuts from Pop-up Neighborhood Cartridge in your design. Contest will open on July 23rd. Please upload a working link or picture of your project to the blog under the Magazine Challenge tab. Please, one entry per person. Entry deadline is Friday, August 12th. The winner of this contest will receive $150.00 credit to Cricut.com! How fun is that?


Thanks for stopping by

Wednesday, August 3, 2011

Cricut crop

I think the biggest benefit to me joining the cricut circle has been the friendships that I have made. We have a group of ladies in my area that get together at least every 3-4 months and we scrap/card make. We share ideas and life stories and it has really brought me out of the shell I was once in. On April 9th we held one such event at one of the ladies churches.


This is Karendkrafter from the circle message board. She has become my best all time scrapping/ life time friend. We met for the 1st time almost a year ago at the Fall Scrapbook expo. She is just the best!


We spend the whole day, talking and crafting


We have contests and swaps


and meet cute new little ones.


Get inspiration from each other


and work on project of our own


It really was the best day ever and every get together is just as wonderful. Not sure what I would do without this group of wonderful ladies. Thanks Cricut Circle for getting us together!


Saturday, July 30, 2011

Roberts Crafts Freebie Friday

Don't forget to enter here:

http://blog.robertscrafts.com/

Thursday, July 28, 2011

JULY MONTHLY CHALLENGE: Let’s Eat Challenge!

I created this for the challenge over at the Cricut Circle:
The Challenge: Create a project of your choice with a BBQ, Picnic, or Patio theme AND use a gingham or check pattern somewhere on your projects. Your project must include atleast 2 different Cricut Image Cuts.

Rules and Guidelines: Circle Blog Challenges are open to Cricut Circle Members only. You can create any type of project you would like (tag, altered project, mini album, etc.) but your project must be newly created for this challenge and include atleast 2 Cricut Image Cuts. You must submit a project to be entered into the Challenge Prize Drawing.

I used the Block Party Cricut lite cartridge to make this fun invite. Paper was from a Die Cuts with a View stack and then from my stash.


Posted by Picasa

Thursday, July 14, 2011

Roadtrip to CHA! Pennat contest

The Cricut circle blog is having a pennant contest for cricle members. The ‘pennant’ you are creating is a way for you to showcase your state, country, or providence. They will use all the pennants to decorate the room and make one giant banner. The requirements were the theme: The pennant should be your representation of the state, providence or country of your choosing and The pennant shape is from the BIRTHDAY BASH CARTRIDGE. The ‘pennants’ that can be used are in the font sections on pages 58-70. Please use a ‘fit to page’ for a 12×12 inch piece of paper. Pennants larger than 12×12 will be disqualified.
Although I have had an ide in my head I hadn't decided until Monday that I would enter and the pennant has to be in West Jordan by end of day on the 18th of July. I worked on this for about an hour half every day this week and was able to finish this evening. I will take it to the post office tomorrow and mail it with speedy delivery and confirmation so I know that it got there. ">
I picked Utah for my theme for obvious reasons ( I live here) and knew that it had to have bees and a beehive. Since we are the Beehive state. I used the bees and beehive from the create a critter cricut cartridge, cutting the bees in different sizes. I found some glitter card stock and Roberts that I used on the bees to make them stand out bit. The banner at the top was cut from birthday bash and I cut the bird off. The whole Utah banner was just me putting random stuff together and liking it. I decided since Provo craft in in Utah and crickets play an important role in Utah history that the circle bug head just had to be on there. I found a Utah state map online and decided to add that to the background. Also the sego lilies are from a picture I found online. The bees were attached with wire so they would wiggle a bit. After getting it altogether it was still missing something at the top. I decided that it needed sea gulls and with the help of a friend I was able to find the perfect stickers. I really like the way it all came together.

Wednesday, June 8, 2011

Crabby Birthday card

This is the card that I made for the IMAGINISCE SPONSOR CONTEST! over on the cricut circle blog the contest rules were: Use at least 4 Cricut Cuts from any cartridge in your design and at least 3 Imaginisce products like their paper, I-top, I-Rock, Stickers, ribbon or any other product they produce in your design. Other than the I-bond and the I-rock I wasn't certain I had any other Imaginisce product in my stash. I went out and bought a stamp just to make sure I had 3 products in my project.

As I was going through my craft room I found their Let's Pretend paper stack and I build a card kit so I was set. I used Create a critter for the crab and he is cut from the paper out of the let's pretend stack at 2.5 inches. The birthday had he is wearing was also cut from that stack (that's 2 cuts so far and one imaginisce product). I used my I-rock (#2 product) to add the orange bling for his eyes. The tag was the stamp that I bought (#3) and after stamping I cut it out. The happy birthday is a sticker from the build a card stack that I cut to fit (#4) I wanted the sand castle (cut #3) to look realistic so I cut it from sandpaper as well as adding the beach sand. The because I needed one more cut I added the seaweed also from create a critter (#4 cut) All the other paper is from the Sizzix line of paper. Thanks for looking!

Wednesday, June 1, 2011

Roberts crafts giveaway

http://blog.robertscrafts.com/2011/06/fathers-day-gifts.html

Tuesday, May 31, 2011

Cricut Circle MAKE IT YOUR WAY CONTEST!

I created this house warming Card for a friend as well as for the cricut circle blog magazine challenge. For this challenge I had to use the Cricut Circle Magazine a stepping off point to create something my way. There were several project about Welcoming Neighbors so I thought this would be perfect. I also had to use 3 cuts from my Cricut which for this card I did.


These were all cuts from the Mickey and Friends cartridge. The house and mailbox are Minnie's House and all the other elements are found on the cartridge as well. The background is clip art from my collection over the years and again the paper is from my stash.


It's a perfect welcome card or Congrats on the New House card.

Weekly Challenge #33: Sweet Summertime Challenge!

This weeks Challenge on the Cricut Circle blog is to make a project using your favorite summer time treat. Who could not love ice cream cones in the summer time. This was made with the Doodlecharms cartridge and the celebrate came from George and basic shapes. Paper is just various from my ever growing stash.


Thanks for looking and now off to create two projects for the magazine challenge

Friday, May 27, 2011

{Easter Time}

Here are some super cute treats I made for Easter. I found myself in need of something cheap for Easter treats since money is tight right now (I know who isn't having that issue right?)
I found at the dollar store a pack of 4 boxes of matled milk balls and a pack of 4 carrots that held powdered sugar (think Pixie stik)

I bought all the had and came home to come up with a cute idea.

I stuck the carrot to the top of the box with a glue dot and wrapped ribbon around it.


The using my mini bow dabra I created the cutest little bows ever and glued them on top.


The plan was to make some super cute creative tag but I got busy hanging out with my husband and time got away from me. So I grabbed some precut tags and my Happy Easter stamp and created the tags for them.


They were a hit and didn't take long at all and most of all because I used stuff I already had on hand they didn't cost a boat load.

Monday, May 23, 2011

I entered the craftiest mom contest through Cricut in hopes to win a Cricut Expression 2 Anniversary Edition. Please take time to vote. You can vote once a day.
http://apps.facebook.com/contestshq/contests/114794/voteable_entries/21714283?ogn=facebook

Saturday, May 21, 2011

Birthday Cake pop up card

Here is a birthday card I made for a customer of my mine for his girlfriend's birthday. I was told she likes pink, purple and sunglasses and with that I was able to come up with this design for the outside of the card. The sunglasses were cut from the Paisley cartridge with solid color paper. I made the "glass: part with purple foiled paper so they would reflect like sunglasses. It gave it that little pop it needed. The bling was added to the side with my I-Rock gem setter by Imaginisce


For the inside I used the birthday cake pop up from the Everyday Pop up cards (page 84)


As with the table and vase card I was able to use the additional instructions as a better guide as to how to put this one together.


Here is my final project. I was able to make the frosting piece out of a coordinating paper from the front of the card and keep it pink and purple.


Closing the card


It's all flat now


There is a little bit of spring to the card


a better look at it all opened again


The more I use this cartridge the more I am starting to like it and the additional instructions really help. If you are on the fence with this one I would get off the fence and hurry to your local scrapbook store and buy it. Or you get it here

Friday, May 20, 2011

Pop up Mother's Day Card Table and Vase

I made this card for my mom for Mother's Day using the Cricut Everyday Popup cards cartridge and the Mother's Day Bouquet Cartridge. The outside was prety easy to make I jsut cut a few different flowers out of different colors and different sizes and stuck them together with a jeweled brad. I then cut the Happy Mother's Day from the Mother's Day 2010 cartridge.


It was the inside that was a little tricky and I must say it took me three days and a lot of frustration to figure it out. The handbook that came with the cartridge does not have any decorations what so ever. I searched all over the net to see if someone had made this and could shine a light on how it's done. Some one out there came up with a complete diagram of these cards to give some idea how it's made. You can see them here:


http://s271.photobucket.com/albums/jj126/jwmech/Provo%20Craft/
The instructions still are not the greatest with some of this images but it's at least something. Here it is all glued together on the inside of the card. I recommend using something fast drying that sticks super well. I htink my main problem was the adhesive I was using. I finally broke down and used my Elmers glue and let it dry forever.


I do think it turned out quite well and I am very pleased with the results. I don't know if I will ever make this one again though. Did I mention it took me 3 days to get it right?


I also recommend using super stiff paper for the little peice under the table as this is what will hold the edges of the table up so when you open it you have flat table and the vase sits on top.


I think I am going to like this cartridge very much.